Hi all,
I thought I would go against tradition and blog on a day that's not a Sunday. And the reason... well I'm excited, that's why.
So over the past few weeks I've been stalking gumtree and ebay trying to find a bargain on some hard panniers to carry all my gear for my trip.
I've got some throw-over soft panniers that I've had since I first started riding (2004) and as ace as they have been, its time to upgrade. I think I came to this realisation on my 2011 when the contents of the left pannier fell out on to the campsite grass where the bottom had split open. Needless to say the Ray Mears in me soon used some cable ties and string to patch it up but, in all honesty, I'm getting to old (lazy) for that shizz and need to get some hard panniers. Also the benefit of hard panniers is that your spare gloves don't get wet inside your panniers when its been peeing it down with rain in Norway for 8 hours straight (I'm only just realising now how much of a complex these soft panniers have given me).
So, back to my new panniers. As I think I mentioned in a previous post I already had a top box but when I first went to fit the rack for it to the Suzuki it was missing some vital spacers and bolts. Luckily when I got the rack for my panniers these were included. Soooo on Wednesday night, after the the busy-ness of Mrs Arctic Ride's birthday over the weekend, I set myself an hour to fit the new rack. To fit the side boxes you need to move the indicators and I made this video just before I did that.
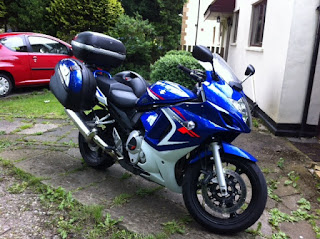
My famous last words of 'all I need to do now is move the indicators' came back to bite me in the backside as it took me a further hour to move and re-fit the indictors when I thought it would take about 5 minutes. Doh! Well that taught me a lesson... don't comment to how easy something is until you have finished it. I was going to do another video showing the final product but I was far to annoyed after taking another 60 minutes out of my life to re-fit the indictors, so these photos below will have to do.
That's all for today folks.
Twitter - 'Follow' @arcticride2014
Facebook - 'Like' Arctic Ride 2014
YouTube - 'Subscribe' - Arctic Ride 2014
Donations - With 100% going to charity CerebraCLICK HERE TO DONATE
Ride Safe,
Gordon
I thought I would go against tradition and blog on a day that's not a Sunday. And the reason... well I'm excited, that's why.
So over the past few weeks I've been stalking gumtree and ebay trying to find a bargain on some hard panniers to carry all my gear for my trip.
I've got some throw-over soft panniers that I've had since I first started riding (2004) and as ace as they have been, its time to upgrade. I think I came to this realisation on my 2011 when the contents of the left pannier fell out on to the campsite grass where the bottom had split open. Needless to say the Ray Mears in me soon used some cable ties and string to patch it up but, in all honesty, I'm getting to old (lazy) for that shizz and need to get some hard panniers. Also the benefit of hard panniers is that your spare gloves don't get wet inside your panniers when its been peeing it down with rain in Norway for 8 hours straight (I'm only just realising now how much of a complex these soft panniers have given me).
 |
| Fully fitted luggage |
So, back to my new panniers. As I think I mentioned in a previous post I already had a top box but when I first went to fit the rack for it to the Suzuki it was missing some vital spacers and bolts. Luckily when I got the rack for my panniers these were included. Soooo on Wednesday night, after the the busy-ness of Mrs Arctic Ride's birthday over the weekend, I set myself an hour to fit the new rack. To fit the side boxes you need to move the indicators and I made this video just before I did that.
My famous last words of 'all I need to do now is move the indicators' came back to bite me in the backside as it took me a further hour to move and re-fit the indictors when I thought it would take about 5 minutes. Doh! Well that taught me a lesson... don't comment to how easy something is until you have finished it. I was going to do another video showing the final product but I was far to annoyed after taking another 60 minutes out of my life to re-fit the indictors, so these photos below will have to do.
 |
| Starboard Quarter View |
 |
| Port side view |
Twitter - 'Follow' @arcticride2014
Facebook - 'Like' Arctic Ride 2014
YouTube - 'Subscribe' - Arctic Ride 2014
Donations - With 100% going to charity CerebraCLICK HERE TO DONATE
Ride Safe,
Gordon